MAKE YOUR OWN BUNDLE - BUY ANY 3 SVGS - GET 30% OFF

Laura Shirley | Jul 9

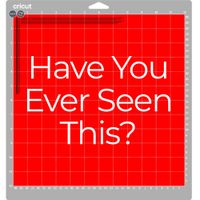
How To Avoid the RED MAT in Cricut

Step by step instructions on setting score lines


If you’ve ever uploaded an SVG file and hit "Make It" in Cricut Design Space only to see that dreaded red mat with all the scattered lines, you aren’t alone! It’s one of the most common hiccups when working with SVG files in Cricut Design Space.

Usually, this happens because the software thinks your score lines are meant to be cut lines, or it doesn't realize those lines are supposed to stay stuck to your project. Don't sweat it—here is a quick, friendly guide to getting those files fixed and your project back on track.


Step 1: Prep and Upload

First thing’s first: make sure you save your SVG file somewhere easy to find, like your Desktop or a specific "Cricut Projects" folder.


Open a New Canvas in Cricut Design Space.


Click the Upload button on the bottom left.


Select Upload Image.


You can either drag and drop your file into the box or click Browse to find it on your computer.


Once it’s uploaded, select it and click Add to Canvas.


Step 2: Find the Lines to Be Scored

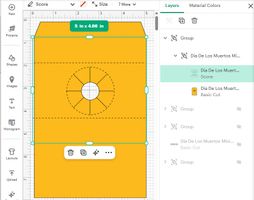
When your design lands on the canvas, it usually comes in as one big giant group. To find the scores go to the Layers panel. In my designs I group the line to be scored with its object. Click the little arrow for the group to find the lines that need to be scored.

Step 3: Change "Cut" to "Score"

This is the most important part! By default, Cricut thinks every line in an SVG is a "Basic Cut." If you leave it that way, your machine will slice your project into pieces instead of folding it.


Select each of the score lines.


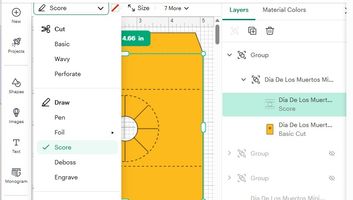
Go to the Operation menu in the far left of your top toolbar (it will have a little pair of scissors and the words “Basic Cut”) .


Change the setting from "Basic Cut" to

Score.


Pro Tip:

You’ll know it worked because the solid line will turn into a dashed line on your canvas.


Step 4: Don't Forget to Attach!

Even if the line says "Score," Cricut won't know where to score unless you "glue" it to the shape.


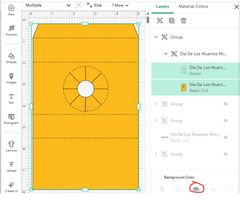
Select the score line and the object it belongs to at the same time.


Click the Attach button at the bottom of the Layers panel.


Repeat this for every grouped set of objects in your design.


Step 5: Ready to Make It

Now you’re ready to hit Make It! Design Space will show you exactly how many mats you need of each color and which tools to load (like your scoring stylus or wheel).

A Note on Mats: While there are plenty of YouTube videos out there showing you how to "hack" your mats to save space, I recommend sticking with the layout Design Space suggests. It keeps things simple, organized, and much less stressful—especially when you're just starting out!

Happy crafting! You've got this.


Let’s create what matters — together.

Laura Shirley

More Posts

A Fiesta of Memories: Crafting the Vibrant Spirit of Día de MuertosA Fiesta of Memories: Crafting the Vibrant Spirit of Día de Muertos
A Fiesta of Memories: Crafting the Vibrant Spirit of Día de Muertos

If there is one thing I love most about paper crafting, it is the magic of taking a few simple sheets of cardstock and turning them into something bursting with heart, memory, and love.

Growing up in California, I was lucky enough to be surrounded by colorful cultural celebrations, but Día de Muertos (Day of the Dead) has always held a truly special place in my heart. The moment November arrives, homes and streets fill with glowing candles, brilliant golden marigolds, playful sugar skulls, and music. It is anything but spooky—it is a joyful, warmth-filled family reunion where we honor and celebrate the sweet memories of loved ones who hold a permanent place in our hearts.

If you’ve been looking for a meaningful way to bring this colorful, family-focused celebration into your home, you are in the right place! With your Cricut or Silhouette machine, you can turn colorful paper into radiant home decor, and glowing keepsakes to celebrate family for this festive time of year.

How to Download & Unzip Your SVG Files: A Friendly Step-by-Step GuideHow to Download & Unzip Your SVG Files: A Friendly Step-by-Step Guide
How to Download & Unzip Your SVG Files: A Friendly Step-by-Step Guide
Learn how to easily download and unzip SVG cut files for your Cricut or Silhouette machine with this simple, step-by-step guide.
The Ultimate 3D Paper Crafting Glossary: Your Friendly Guide to Cricut  Silhouette TermsThe Ultimate 3D Paper Crafting Glossary: Your Friendly Guide to Cricut  Silhouette Terms
The Ultimate 3D Paper Crafting Glossary: Your Friendly Guide to Cricut Silhouette Terms

Hello there, creative friend! 💖

If you’ve ever looked at a gorgeous, intricate 3D paper project and thought, "That looks absolutely magical, but what on earth do all these terms mean?"—please know you are not alone! When I first bought my electronic cutting machine, I felt completely overwhelmed by letters like "SVG," words like "basis weight," and software buttons I didn't understand. I made every "rookie" mistake in the book so you don’t have to!

My mission at Bella Carta Design is to make 3D paper crafting joyful, accessible, and completely frustration-free. Think of this glossary as your cozy, trusted crafting companion. Grab a warm cup of tea, and let's demystify these terms together so you can start creating cute crafts with paper and heartfelt hand craft gifts today!

Instructions for Downloading Zip Files
Why Handmade Cards Matter More Than EverWhy Handmade Cards Matter More Than Ever
Why Handmade Cards Matter More Than Ever

In a world overflowing with digital notifications, emojis, and text pings, something as simple as a handmade card can feel like a rare treasure. It’s tangible, thoughtful, and deeply human. And right now, in this season of Gratitude and Giving, handmade cards matter more than ever. 

<p>Let’s Get Crafty! 7 Cutting Machine Tips I Wish I Knew Before I Started</p><p>Let’s Get Crafty! 7 Cutting Machine Tips I Wish I Knew Before I Started</p>

Let’s Get Crafty! 7 Cutting Machine Tips I Wish I Knew Before I Started

Hey there, friend! Laura Shirley here, and I am so glad you stopped by. Opening up a brand-new cutting machine is such a thrilling moment, but if I’m being completely honest, it can feel a little intimidating, too. When I first brought home my Silhouette Cameo 4, I had grand visions of instantly creating beautiful hand craft gifts, interactive pop-up cards, and charming home decor.


Spoiler alert: my early attempts mostly turned expensive cardstock into colorful confetti!

Whether you're opening up your machine for the very first time, searching for fresh cricut inspiration, or planning cute crafts with paper to fill your weekend, I’ve made all the "rookie" mistakes so you don’t have to. From setting up your mat in cricut space to finding the best svg files for cricut, silhouette, or laser tools, these seven tips will take you from "What on earth does this button do?" to crafting with total confidence. Grab a warm cup of coffee or tea, and let’s jump in!

<p>FAQs:</p><p>FAQs:</p>

FAQs:

Find solutions for paper craft cutting and software issues with Silhouette, Cricut, Brother ScanNCut and others. Find craft ideas for hand craft gifts, cricut projects, 3d svg files, and pop up card svg setups.

<p>Project Instructions</p><p>Project Instructions</p>

Project Instructions

Here you will find step-by-step instructions and video tutorials on how to make our 3D SVG paper craft projects for Cricut, Silhouette and laser cutters.